1
Install GAIA
Download Install GAIA from amd-gaia.ai and run it. On Windows, tick GAIA Agent UI (desktop app) on Choose Components, then open GAIA from the Start Menu.Other platforms and install methods are under Other ways to install.
2
Let GAIA check your PC
The first launch opens setup. Check this PC looks at your processor, GPU, NPU, memory and disk. You don’t need to do anything but wait for it to finish, then press Continue.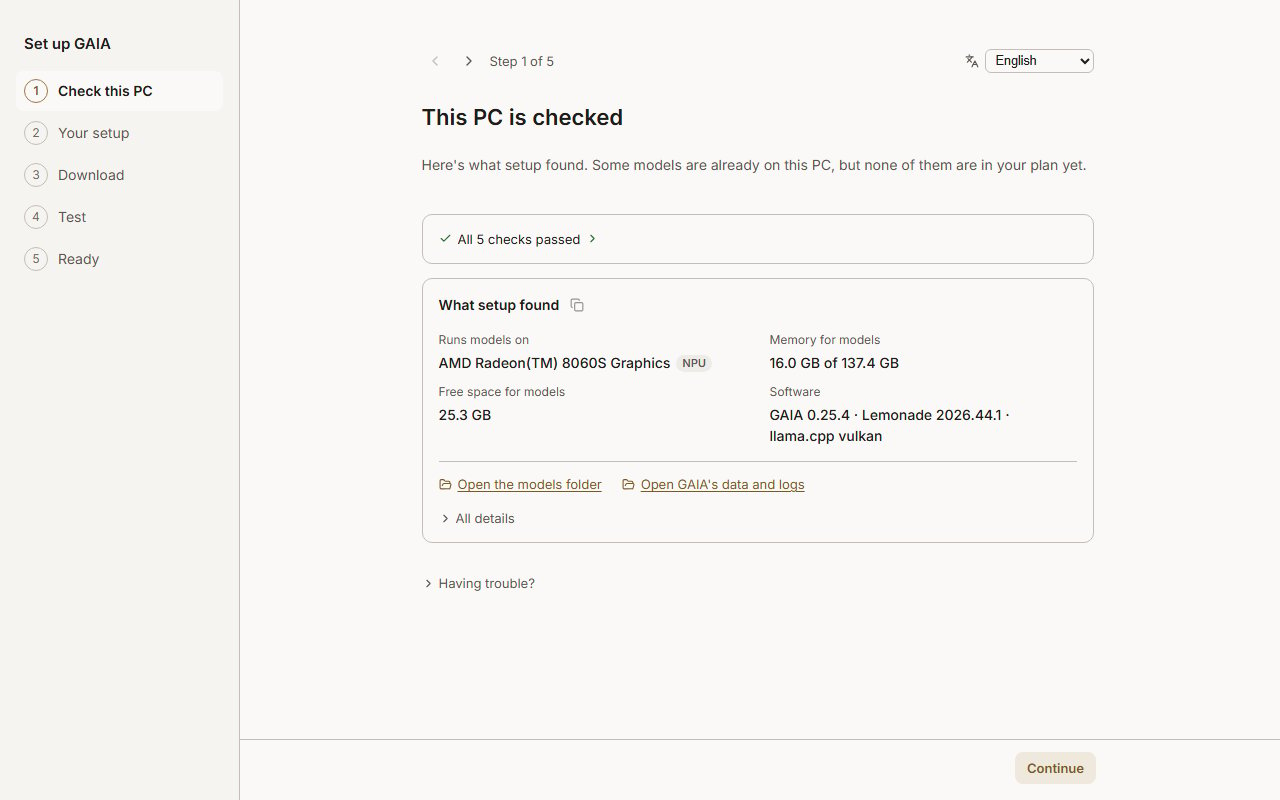
3
Choose where chat runs
Your setup offers two cards: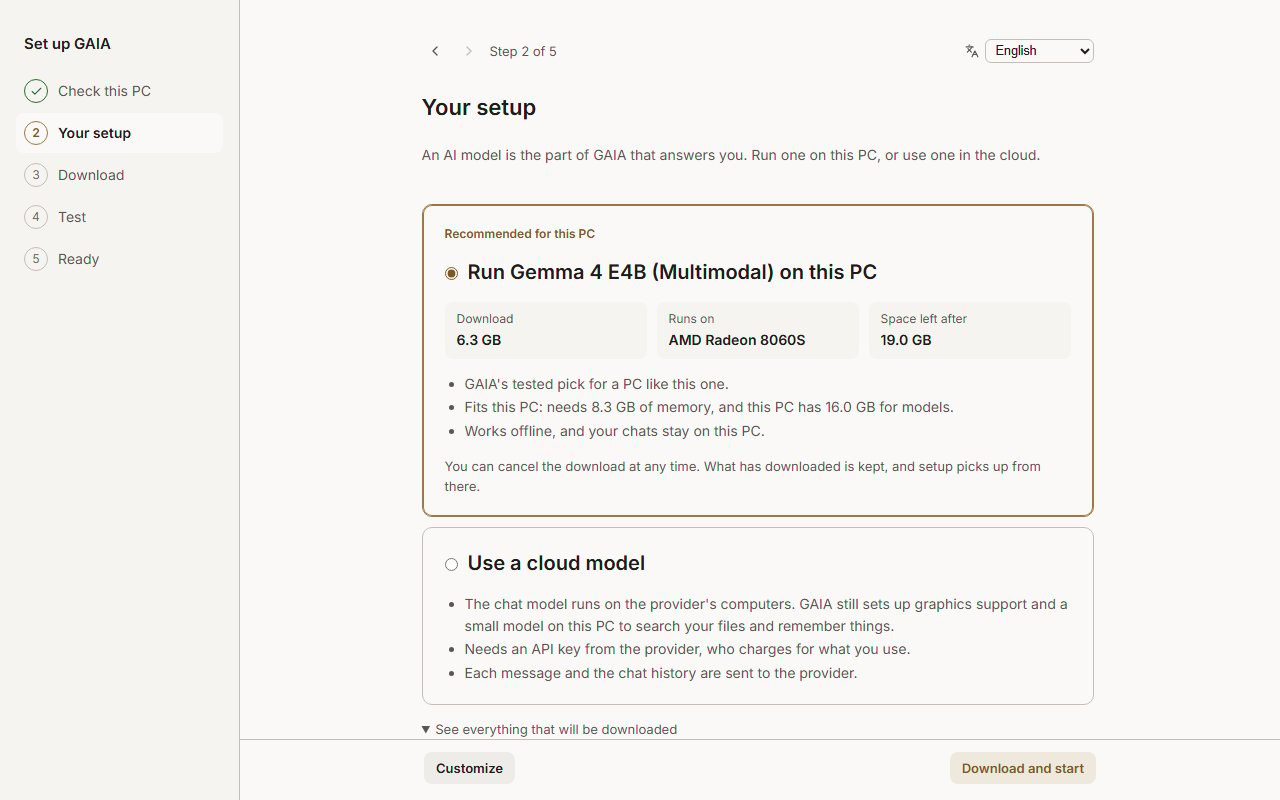
- A model on this PC, such as Run Gemma 4 E4B (Multimodal) on this PC, marked Recommended for this PC and already picked. The card shows the download size and what it runs on. Your chats stay on the PC.
- Use a cloud model. Nothing large downloads, but you need an API key and each message goes to the provider.
4
Download and start
Press Download and start. Nothing downloads before this. The screen shows each part, its size, the speed and the time left. You can leave it running; Cancel keeps what finished.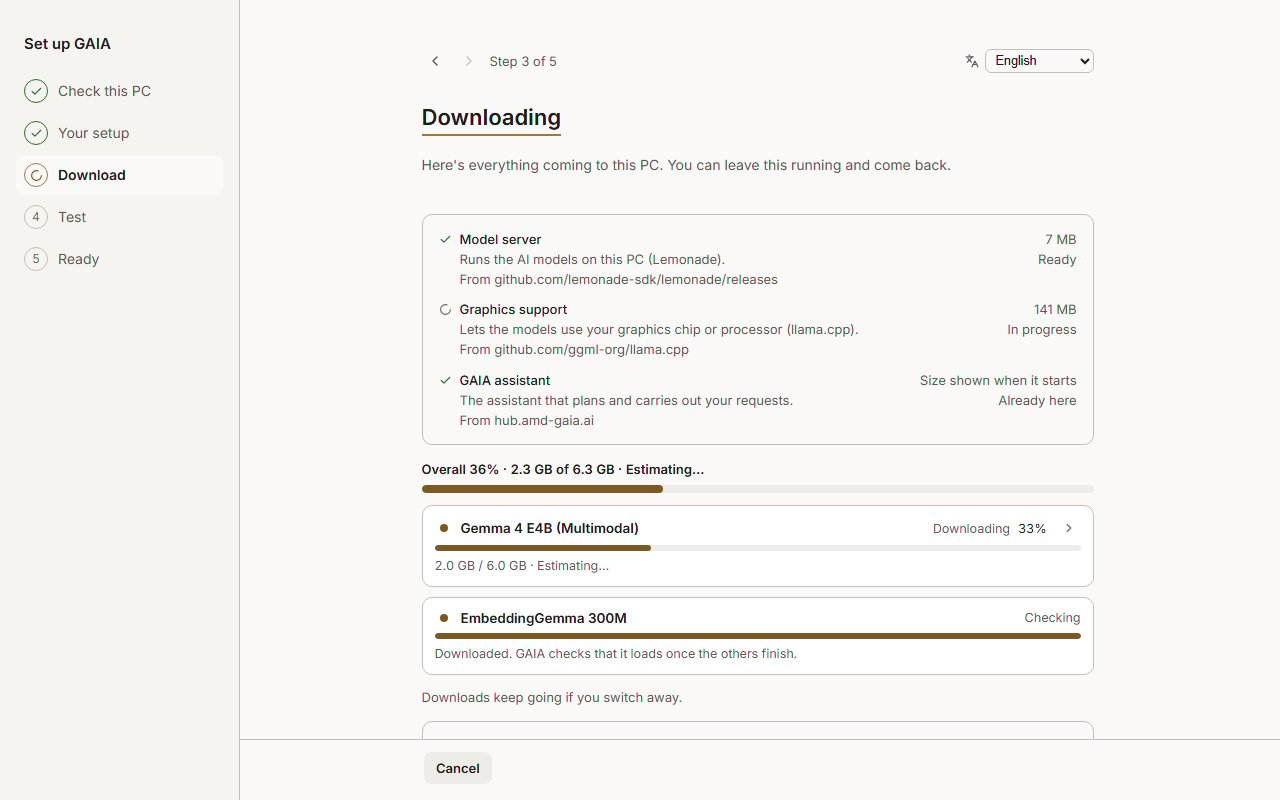
5
Wait for the test
Test loads the model and asks it one real question, so you know GAIA works before you use it. When the required tests pass, setup says GAIA is ready. Press Start chatting.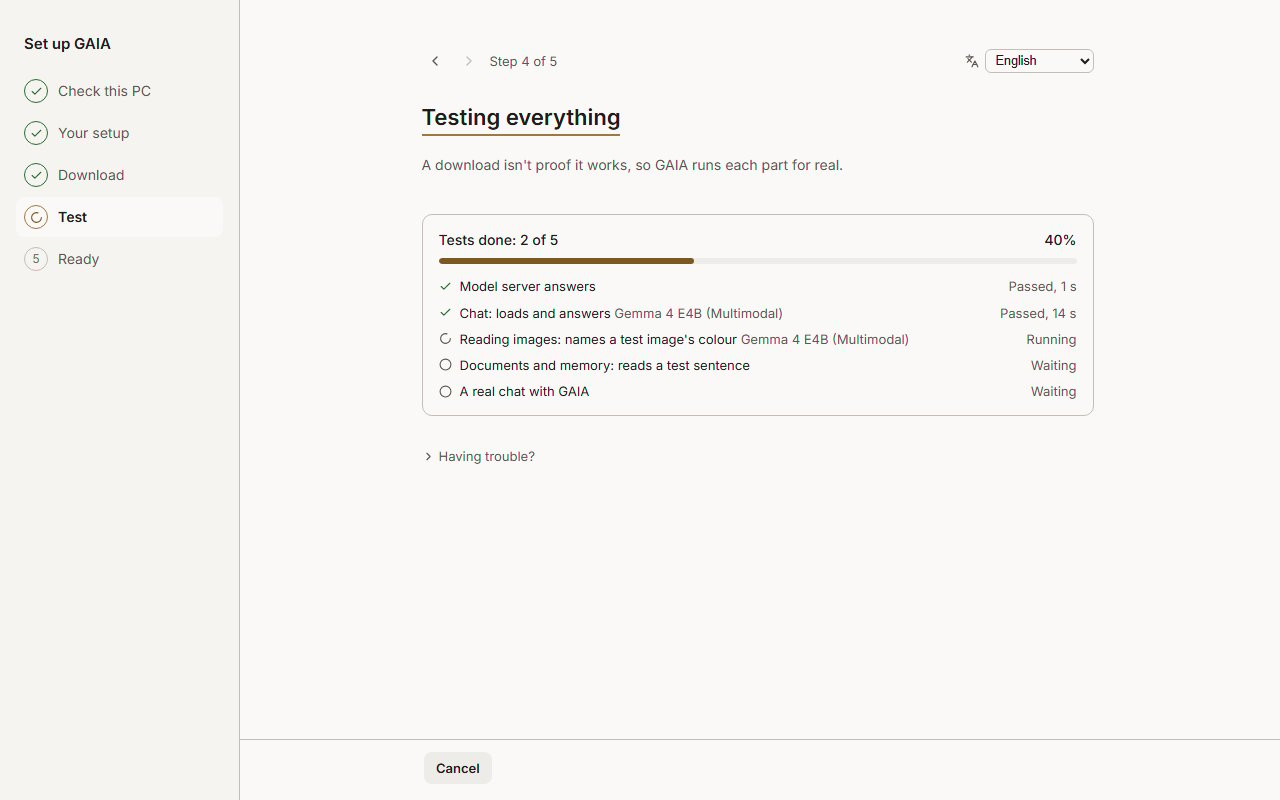
6
Ask your first question
Type a question in the message box and press 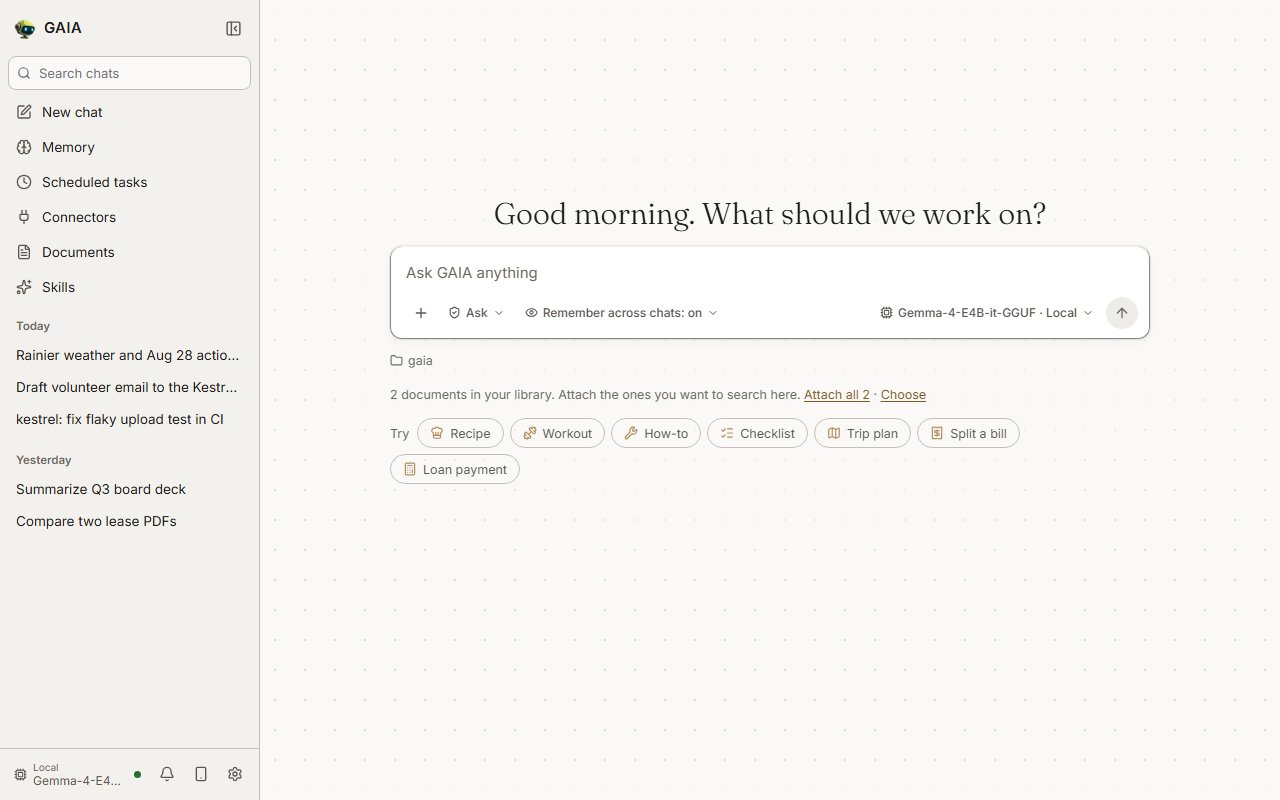
Enter. The Try row under the box fills in an example if you’d rather start from one.“Give me a recipe for banana bread” “Split a $142 dinner four ways with a 20% tip”
7
Ask about one of your files
Drag a PDF or a spreadsheet into the chat and ask about it.
“Summarize this PDF in 3 bullet points”GAIA reads the file on your PC. See Documents, files and history.
8
Answer GAIA when it asks
Before GAIA changes a file or runs a command, it asks above the message box. Choose Allow once, Always allow or Deny. See Permissions.
9
Look at what the answer used
The panel on the right of a chat shows what the answer read, what the chat made and changed, and what it may touch. See The session panel.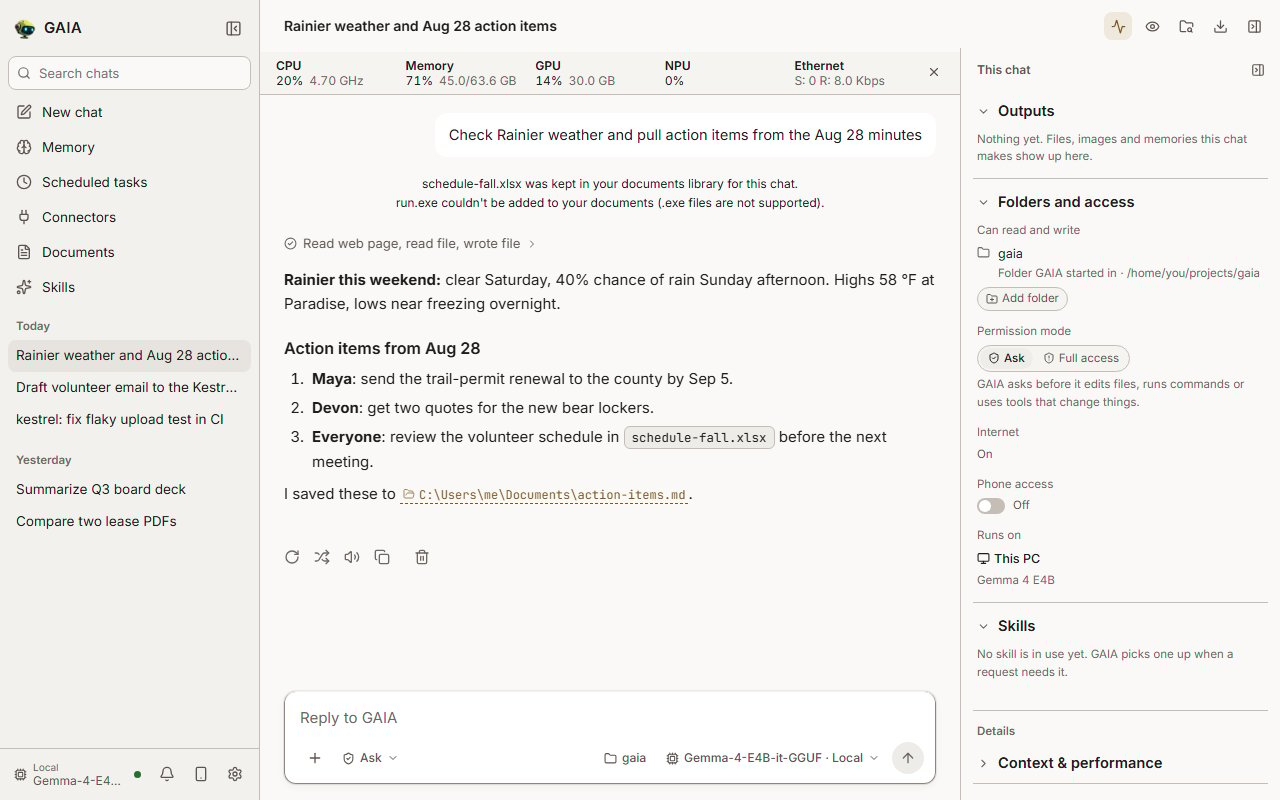
What to try next
Chatting with GAIA
Queue messages, edit and retry, compare models, cards and read aloud
Documents, files and history
Ask about documents, find files, review and undo changes
Models, control and privacy
Switch models, see where answers run, and decide what GAIA may do
Connect and extend
Skills, your mail and calendar, memory, scheduled tasks and your phone
Your first chat screen
The app opens straight to an empty chat: a greeting and a message box over a quiet field of dots laid out like the NPU’s tile array. The dots say what GAIA is doing: they sweep while a model loads, fill from the bottom up while one downloads, and stir under the pointer and with each keystroke. The message box stays put while you type; send, and it drops to the bottom of the window and the dots clear away so the chat starts on a clean page. With reduced motion turned on in your system settings, the dots hold still.- “Loading Qwen3.6-35B-A3B on your GPU… 12s” under the message box means the model is loading and reading GAIA’s instructions ahead of your first message, so that message gets a quick answer. You can type and send meanwhile; a message sent early waits for it to finish rather than starting over.
- + attaches files, or drag them in.
- The shield picks the permission mode: Ask or Full access.
- The model chip shows which model answers and where it runs. Click it to choose another.
- The sidebar on the left holds Memory, Scheduled tasks, Connectors, Documents, Skills and your chats.
Setup in detail
The steps above are the short path. This section covers every screen of setup and the choices behind Customize.Check this PC
First run: no separate setup command is needed. The window opens and GAIA checks the PC by itself: processor, GPU, NPU, memory, disk, its model server and the backends this PC supports. Check this PC shows what it found, with links to the models folder and GAIA’s data and logs, and opens each check and the full details on request. If a model server (Lemonade) already runs on the PC, it asks which one GAIA should use: Install GAIA’s own, recommended because it is the version GAIA is tested with and keeps its own copy of each model, or Use the one I have, which keeps one copy of each model. Your setup then offers two cards of equal weight: a model on this PC, recommended and picked, with its download size and the reasons, and Use a cloud model, which downloads no chat model, needs an API key and sends each message to the provider. Download and start takes the local setup; with the cloud card picked, Continue opens the provider’s key. Each step’s main action is at the bottom right, and the language can be changed from the first screen.Customize
Customize, at the bottom left of Your setup, opens the model choices; the steps beside the screen stay the same. Run on comes first: Graphics (GPU), which uses llama.cpp on Vulkan, or Ryzen AI NPU, which uses FastFlowLM, on a PC whose NPU has the memory for GAIA’s NPU model or already has an NPU model. These are the two GAIA has tested. Picking one picks that device’s chat model, and the chat list shows only that device’s models. Setup keeps llama.cpp on Vulkan when it starts. On an integrated GPU, Change how memory is split opens GPU memory from there or from Check this PC. It is optional: unless you pick a new size, GAIA changes nothing. The models are grouped by job, and picking a chat model updates the jobs that depend on it:
What you’ll get shows the result of those choices. A model too big for
this PC’s memory, or a selection too big for the disk, gets a warning with
the numbers, and you can still go ahead.
Download
Download lists everything that comes to this PC, with its size and where it comes from: the model server, the model runtime, Python packages, the GAIA agent and each model. Models show per-model and overall progress with speed and time left. Before the models start, the line under the list names the part being set up and how far its download is. Cancel sits in the bottom bar while setup works, including while GAIA’s model server starts on Check this PC. Cancel keeps what finished, and Retry or Resume continues from there. Tick Keep trying if the connection drops to wait out a dropped connection for up to two minutes. Optional extras can be added here too; they are fetched and tested after the rest.Test
Test runs what you downloaded, because a download doesn’t prove it works: the server answers, the chat model loads and answers, the vision model names the colour of a test image, the embedding model makes an embedding, each extra does its job, and GAIA answers one real message, on the cloud model when you chose one. Setup says it’s ready only when the required tests pass. A failed test shows the error with Test again, Choose another model and, for a broken model, an option to download it again. A model that failed for any other reason, such as too little free memory or an empty answer, keeps its file: its Retry tests it again without downloading it. A test that doesn’t finish in time stops with an error instead of hanging. Runninggaia init
yourself beforehand also works.
If setup has trouble
Each step keeps a log. The logs and Save a troubleshooting report sit under Having trouble? at the bottom of every step, which opens by itself when a step fails. A redrawn progress bar shows only its last line. Save a troubleshooting report saves setup’s logs, GAIA’s logs and this PC’s details in one file. API keys and other secrets are removed from the logs, but a log can quote your chats, so look it over before you share it. A copy stays in~/.gaia.
If that first-launch setup fails (for example, too little free memory to
load the model), the new-chat screen shows GAIA’s error and a Choose a
model button, so you can switch to a cloud model or a smaller one before
your first message. Setup runs again on the next launch.
Change your choices later
Later, if a job needs a model that isn’t on this PC, GAIA says which one, how big it is and where it comes from, and offers Download and continue. Your message waits until it’s ready. Settings → Setup lists everything setup chose, each with a link to where you change it, and Run setup again goes through it once more. Your models, keys and chats stay. Every choice can be changed later in Settings → Model: the default chat model and the models on this PC under Manage downloads and disk space (tick a skipped model and Apply to download it; Remove deletes one only after you confirm), GPU memory on integrated-GPU PCs, and the downloads in progress, which also show in the sidebar while they run.Other ways to install
Install GAIA is the full install guide, including silent installs, updating and uninstalling. The paths below all give you the same app.- Desktop installer (easiest)
- npm
- Python CLI
Prebuilt desktop installers are published on the
GitHub Releases page alongside
each tagged release. They bundle the Electron shell and Lemonade Server
and download no models; on first launch the app asks which models to
download. This is
the simplest path for non-developer end users.Artifact naming (See the Packaging & Distribution page for more detail on
the installers, supported platforms, and signing.
electron-builder.yml):
gaia-agent-ui-<version>-<arch>-setup.<ext> — e.g. gaia-agent-ui-X.Y.Z-x64-setup.exe
and gaia-agent-ui-X.Y.Z-amd64.deb.Windows (.exe):- Download Install GAIA for Windows from amd-gaia.ai (
gaia-<version>-win-x64-setup.exe) and run it. - Tick GAIA Agent UI (desktop app) on Choose Components (and the terminal too, if you want it), then launch “GAIA” from the desktop or Start Menu (binary:
gaia-desktop). - Update by running the newer installer; it keeps your choices.
- Uninstall via Windows Settings → Apps → Installed apps → GAIA.
gaia-agent-ui-<version>-x64-setup.exe, is still on Releases for scripted installs of the app alone.Ubuntu (.deb):